Facebook Groups are a great way to grow a community and find like-minded people. This post goes over how to create a Facebook Group.
How to create a Facebook Group
- Go the Groups page in Facebook
- Click “Create Group”
- Name your Group
- Add some people to your Group
- Select Privacy
- Choose whether Group is hidden or not
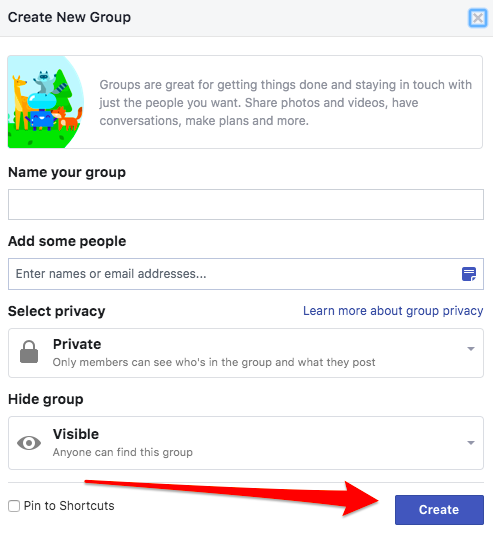
- Click Create Group
- Choose cover photo
- Add a description
- Edit Group settings
- Add members
- Create community and encourage engagement
Here is those steps with screenshots:
1. Go the Groups page in Facebook

2. Click “Create Group”

3. Name your Group

Make sure to name your Group something descriptive so people can find it via search.
4. Add some people to your Group
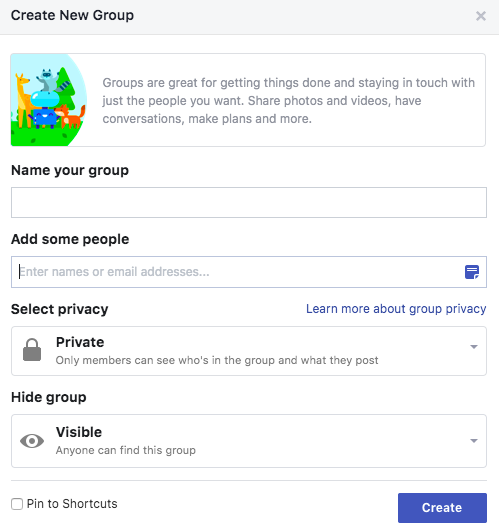
You can skip this step if you do not want to add people right now.
5. Select Privacy

You can choose for your Group to be either Public or Private.
For Public Groups, anyone can see who’s in the Group and what they post.
For Private Groups, only member can see who’s in the Group and what they post.
Private Groups tend to have better community and engagement, as there are many people on Facebook that do not want their friends and family to see their comments made in a Public Group.
6. Choose whether Group is hidden or not

Visible Groups means anyone can find the Group.
Hidden Groups means only members can find the Group, and people can only join via invitation.
If you want to grow a large Facebook Group, it is recommended to choose Visible.
7. Click Create Group
8. Choose cover photo

You can upload a photo, or choose a template illustration.
9. Add a description

Add more information about your Group here. Who is your Group for? What is the purpose of your Group? If you have any Group rules, you can add it here as well.
10. Edit Group settings

Once in the Group settings, you will have the option to customize many settings to your liking.

Items you can change:
- Group Name
- Group Type
- Description
- Location – This can help people find your group more easily if they’re looking for groups in your area.
- Tags – Tags help people find groups they might be interested in joining. You can change these at any time.
- Apps – Tools and features offered by other businesses.
- Linked Pages – Give your business, brand or organization a voice on Facebook and connect with the right people.
- Color
- Web Address – Customize your group’s contact info so you can quickly share a link to your group.
- Privacy Settings
- Hide Group
- Badges – Enable members to earn badges to encourage participation.
- Post Topics – Organize posts by adding relevant topics to them
- Membership Preapprovals — Do you want to let anyone add members or should only you be able to?
- Membership Requests – Learn more about people who want to join your group by asking them some questions. You can ask up to 3 questions, and only the admins and moderators will see the answers.
- Membership Requests from Pages
- Posting Permissions — Here you can decide if only admins can post or if members can as well
- Post Approval — You can require that all posts be approved by an admin before going live
- Keyword Alerts – Keyword alerts tell you when members use certain words or phrases in your group.
Once you’re done, click “Save”.
11. Add members
Now your Group needs some members. Add some friends you think might be interested in joining your Group.
12. Create community and encourage engagement
All good Facebook Groups require an Admin that adds value to the Group and starts good discussions. Stay active in the Group and post frequently as the Group is growing.
Facebook likes to promote active Groups, so if you want more people to find your Group, create a new post at least a few times a week.
Best of luck to you as you create your Facebook Group!
Want to add your Facebook Page as an Admin of your Facebook Group?
Click below to learn how:
Volunteers – Your staff can use Groups to announce when volunteers are needed. Volunteers can indicate what they want to volunteer for and when they are available. Introduce your volunteers to each other by tagging them in posts. Volunteers will be able to interact with each other, creating a sense of camaraderie that will only boost their willingness to help out. Training – If your nonprofit holds any type of training, Groups are a great way to let participants ask questions and work with other folks in the program. Or you can hold the training through Facebook Groups itself.
Any idea why I do not have the tab for Group Rules under a Public Group I admin? When I click on Membership Questions, it shows a button underneath the Questions section to Create Rules, but clicking on that takes me to Admin Activity every time. Facebook is no help and I can’t find an answer on the web anywhere.
I can’t find it either. Seems to have moved recently
Hmmm, it’s working for me.
Try pasting in your FB group URL with “/setup_rules/” attached at the end.
For example: https://www.facebook.com/groups/236851510584327/setup_rules/
This did not work for me it still took me to Admin Activity. Hmmm…..
Hello, we can’t find it either. The “setup_rules” at the end doesn’t work unfortunately.
I am having the same problem. It is driving me crazy. I hope we can all figure it out.
Facebook seems to no longer have Community Pages, or Pet Pages – which used to be under Public Figures. Why have they gotten rid of these?