The modest superhero of any meeting, the humble facilitator wields great power—helping groups deal with difficult issues, building positive relationships, generating creative ideas, and finding new ways forward—yet draws strength from the most subtle of skills. How do they do it?

They may sound like magicians, but effective facilitators are more akin to fine artists. With well-honed skills, seasoned facilitators sculpt successful meetings—empowering participants, energizing the room, and keeping people on task to reach a desired goal.

Whether you’re new to the facilitator role or an emerging pro, here are three tips that will improve (or refresh) your facilitation savvy and make the next meeting you lead a resounding success.

Tip #1: Understand the Facilitator Role

As a facilitator, you are responsible for making meetings go smoothly and achieving specific objectives. Some basic guidelines will help you fulfill your role:

Empower participants. People participate in different ways. Be sure to provide activities that allow individuals to participate in ways that are comfortable to them. Use a combination of individual, team, and “room” activities to get the most out of participants.

  • Pro tip: People don’t necessarily have to speak up to be heard. Include activities that require writing down ideas before sharing or posting.

Keep conversations on track. Depending on the group, tangent conversations may occur or conversations in general may take up time. Gauge the validity of the conversation and redirect the group to the meeting’s objective when appropriate. Even a four-hour workshop can go by quickly—leaving you with unmet objectives—if it’s not properly facilitated.

Document the process. It is vital to capture all information and insights generated at a workshop or meeting. If you’re the lead facilitator on a team, ask another team member to take notes. If you’re running a meeting solo, be sure to document the process—it should be one of your objectives. In both scenarios, remember to document the process throughout the workshop.

  • Pro tip: During face-to-face meetings, a facilitator should take pictures of the work done throughout the meeting. During virtual meetings, a facilitator should make copies of the virtual whiteboard. And don’t forget to take photos or make copies of the completed activity or decisions made after the workshop is done.

Check in with stakeholders. Particularly for workshops lasting more than 90 minutes, be certain to check in with key stakeholders responsible for the workshop. During the course of the workshop or meeting, conversations may tilt the meeting’s objectives. Ask stakeholders to validate whether the direction you’re headed is, in fact, the direction they wish to go. Then update the objectives, if necessary, and replay them back to the entire “room.”

Tip #2: Develop the Right Facilitation Skills

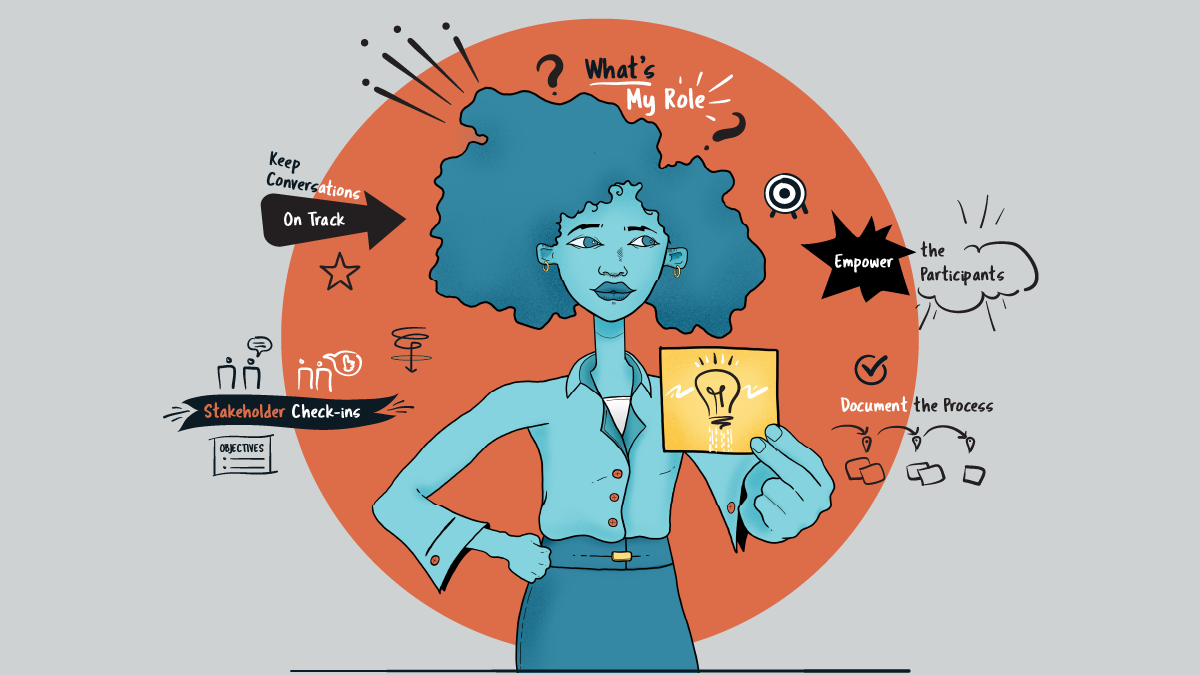
To be a well-rounded facilitator capable of engaging in a variety of topics and handling complex engagements, you need some fundamental skills:

Be an active listener. As facilitator, try to be objective unless you’re invited to provide a perspective. You are there to understand and capture participants’ views, feedback, and insights.

  • Pro tip: Good listening is active, not passive; every word from a participant is an opportunity to help improve your client’s position.

Be sure to listen and reflect key points and ideas back to the participant. Restate or paraphrase these points to make sure you understood them correctly. And then capture—through writing or visualization—the participants’ key points.  

Ask questions. Great questions reveal new insights and expand innovative thinking. Quick answers do not always yield great insights. As a facilitator, you need to dig deeper and sometimes ask questions that may be challenging and have no easy answers.

To accomplish this, when participants seem hesitant or uncertain, ask why. Dig deeper: Use techniques such as the Five Whys to find the root cause of issues and uncover insights or Opposite Thinking to find new ideas and perspectives.

The Five Whys method involves successively asking “Why” on a key comment. Here’s an example:

  • “Our client refused to pay for the product.” Ask why.
  • “The shipment of the product came in much later than expected.” Ask why.
  • “The configuration of the product took longer than expected.” Ask why.
  • “The client’s requirements were extensive.” Ask why.
  • “Their system was custom and our product didn’t line up easily. We had to create custom workarounds to make it work. We didn’t know the extent of the customization.” Ask “Why didn’t you know their system?”

The Opposite Thinking method involves reframing a problem, solution, or comment either inversely or opposite its original intent. Here’s an example:

  • “Our budget is very limited, and we can’t do much within our requirements.”
  • Opposite thinking: “Imagine if you had unlimited resources. How would you tackle this problem?” This type of thinking may spur a direction they did not think of because they were focused on the limitations and nothing else. This may not yield the right solution, but it will yield a direction not previously considered.

Read the room. Constantly assess facial expressions, body language, and group dynamics in the room (i.e. groups/cliques, different departments, senior leadership vs. others) and adjust your facilitation accordingly. In a virtual environment, take note of the level of participation from all participants.

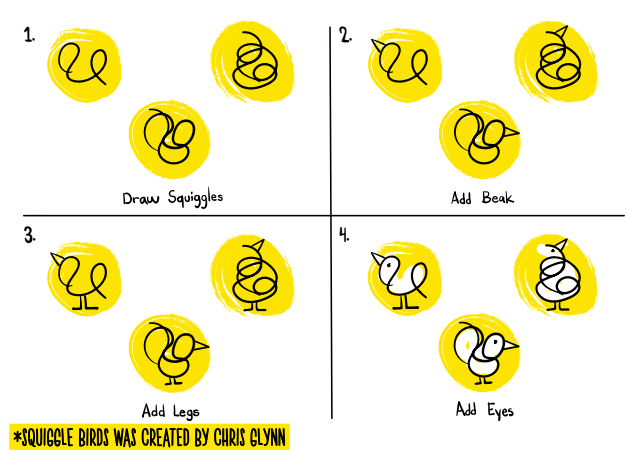
Energize the room when you see fatigue set in. Speak assertively and positively and encourage people to cheer on others. Incorporate fun activities like “squiggle birds,” a simple activity where everyone quickly sketches a simple squiggle then adds three things to make it look like a bird (a beak, legs, and an eye).  
 

Make sure the conversation isn’t dominated by one or two people. These folks may skew the conversation. Use techniques that all can participate in (e.g. have everyone write down their ideas without sharing). Remind participants of the power and benefits of diverse perspectives.

Echo and amplify. When part of the group is gathered and others are virtual, remember that much of what’s said in a conference room isn’t heard by distributed (remote) participants. Be mindful of this by echoing and amplifying key points said in the room. Restate questions asked, highlight decisions made, and paraphrase insightful comments so all participants have the same information.

Reflect and summarize. Like echo and amplify, reflect and summarize helps everyone focus on key points or wrap up an activity. When long discussions occur, you’ll want to summarize what was just heard. This shows you understood what was just discussed.

Tip #3: Know How to End a Meeting

Meetings should not go on forever. Each meeting has a natural conclusion, whether by design or by circumstance. Knowing how to end a meeting is essential for that feeling of success. Here’s how to do it:

Set the right expectations up front. When you begin a meeting, set expectations immediately. This is a key to helping close successfully. Three key meeting components can help orient and set the right expectations:

  • Spell out (or draw) what participants will go through during the meeting. The agenda doesn’t need to be highly detailed, but it should give participants a good idea what to expect in the allotted time given.
  • Meeting goals. Show and validate meeting goals so participants are on the same page. Keep in mind that meeting goals often differ from project goals. You can share both, but be sure participants understand the difference. 
  • Altitude. Set the level (or “altitude”) of the discussion. In strategic or ideation workshops, the altitude is high, and tactical discussions such as “How does this work?” or “What are the specific, detailed steps?” should be avoided.
    • Pro tip: Altitude is an oft-forgotten meeting component but it’s as important as the agenda and the meeting goals. The altitude of discussion should align with the goal or goals of the meeting. In client sessions, XPLANE frequently uses our Elevation Worksheet to help determine an appropriate altitude for a meeting.

Summarize the day. Quickly summarize key decisions and insights.

Facilitate next steps. Given meeting decisions and insights, ask participants to determine next steps.

Excited to Learn More?

Helping a group of diverse individuals reach a particular goal calls for specific skills. We hope these tips help you become the superhero you’re meant to be—a facilitator who leads with finesse and confidence.

As engagements become more complex and your audience more diverse, you’ll need to continue honing and enhancing your skills. We have a course just for you: Design Your Facilitation Strategy. Led by our expert facilitators, they’ll share methods to improve your facilitation skills, lead better meetings, and move your objectives forward.

Don’t forget to reach out to us if you have questions or comments!

Related facilitation resources: